|
|
| (4 intermediate revisions by one other user not shown) |
| Line 2: |
Line 2: |
| {{:Infobox:Blueprint}} | | {{:Infobox:Blueprint}} |
|
| |
|
| 蓝图可以帮助玩家复制一个工厂的各个组成部分,并借助{{L|Construction robot}}将其粘贴到另一处。
| | '''{{Translation|Blueprint}}'''是一种包含建筑物布局的物品。蓝图可以用来复制或者粘贴厂区建筑的各个部分。已有建筑的区域可以被选中并存入蓝图中。放置蓝图时,地图上会出现整个建筑布局的虚影。这个虚影可以为我们手动放置建筑提供参考,但更常见的做法是直接交给{{L|Construction robot}}自动完成建筑的放置。 |
|
| |
|
| == 成就 == | | == 成就 == |
| Line 10: |
Line 10: |
| == 使用方法 == | | == 使用方法 == |
|
| |
|
| {{L|Blueprint}}可以通过点击蓝图对话框里的“新蓝图”按钮获取(此对话框可通过按B键或点击屏幕右上角的蓝图图标打开)。
| | 新的蓝图可以通过点击蓝图对话框里的“新蓝图”按钮获取,此对话框可通过按B键或点击地图上方的蓝图图标打开。蓝图可以用来复制一套建筑布局。 |
|
| |
|
| {{L|Blueprint}}的主要作用为复制一些现有的建筑,形成蓝图图纸。
| | 举例来说,我们可以复制如图所示的小型激光防御阵: |
| | |
| 举例来说,你可以复制如图所示的小型激光防御阵:
| |
|
| |
|
| [[File:Blueprint-example-01.png]] | | [[File:Blueprint-example-01.png]] |
|
| |
|
| === 创建一个蓝图 ===
| |
|
| |
|
| 你可以从工具栏或者背包中选中
| | === 创建蓝图 === |
|
| |
|
| To create a blueprint select the blueprint item out of the toolbar or the inventory. With the blueprint icon shown next to the mouse cursor, click and hold the left mouse button and drag a box as large as needed. All buildings which will be included in the blueprint will be highlighted with a green square. Once everything to 'copy' is inside the drag box, release the mouse button, and the 'Blueprint icon setup' menu will open.
| | 点击工具栏或者物品栏中的蓝图图标来创建一个蓝图。当蓝图图标出现在鼠标指针旁边时,按住鼠标左键拖拽出所需大小的区域。被选中并将被存入蓝图的建筑物将会标有绿色正方形边框(如图所示)。当选中好所有需要复制的建筑物后,松开鼠标左键,“图标设置”菜单会被打开。 |
|
| |
|
| [[File:Blueprint-example-02.png]] | | [[File:Blueprint-example-02.png]] |
|
| |
|
| === 蓝图图纸设计 ===
| |
|
| |
|
| On the top left of the 'Blueprint icon setup" menu there are four icon slots. The game chooses automatically the number of icons and which are pre-selected depending on the number of buildings that are included. This can be changed by simply clicking on the icons to choose the desired ones.
| | === 图标设置 === |
|
| |
|
| On the top right there are two icons to 'create blueprint' and 'cancel blueprint'. The 'create blueprint' icon will also show a preview of how the blueprint icon will look after creation. The 'Blueprint preview' just shows the preview of the blueprint.
| | “图标设置”菜单的左上方有四个图标槽。游戏会根据蓝图中建筑物的数量来自动预生成图标的种类和数量。只需点击想要的图标便可将其更改为蓝图的图标样式。 |
|
| |
|
| On the bottom the 'Total' number of buildings included in the blueprint is shown.
| | “图标设置”菜单右上方有两个图标,分别为“创建蓝图”和“取消蓝图”。鼠标移至“创建蓝图”可以预览创建后的蓝图图标样式。 |
|
| |
|
| Finally, create the blueprint if everything is fine or cancel it. Canceling does not consume the blueprint item. The created blueprint will be in the tool belt or the inventory (or dropped to the ground if no tool belt/inventory slot is available).
| | 蓝图内建筑物的总数量显示在菜单底部。 |
| | |
| | 确认设置无误后便可创建蓝图,否则可以取消蓝图。取消并不会消耗蓝图。创建好的蓝图会自动存放在工具栏或者物品栏中(若物品栏和工具栏已满,则直接掉在地上) |
|
| |
|
| [[File:Blueprint-example-03.png]] | | [[File:Blueprint-example-03.png]] |
| | |
|
| |
|
| === 放置蓝图 === | | === 放置蓝图 === |
|
| |
|
| To use/place the created blueprint select it from the tool belt or inventory. The whole building setup of the blueprint will be shown at your mouse cursor. It is possible to place it rotated, press the default key {{keybinding|r}} to rotate. The blueprint can be placed anywhere inside the green (or orange) 100x100 area of a [[Roboport]], or within range of a [[personal roboport]] installed in [[modular armor]].
| | 若要使用/放置蓝图,只需选中工具栏或物品栏中已创建的蓝图。蓝图中的建筑布局会跟随显示在鼠标指针上。按{{keybinding|r}}键可以旋转整个建筑布局。蓝图可以放置在{{L|Roboport}}100x100的绿色(或橙色)区域内的任何位置,或者放置在{{L|Modular armor}}中{{L|Personal roboport}}的范围内。 |
|
| |
|
| [[File:Blueprint-example-04.png]] | | [[File:Blueprint-example-04.png]] |
|
| |
|
| After the blueprint gets placed somewhere, the buildings are placed as ghost buildings. [[Construction robot]]s will now start to pick up the needed items from the construction network/the player inventory (if using a personal roboport) and place them at the ghost buildings. The required items need to be in the network in an [[Active provider chest]], a [[Passive provider chest]] or a [[Storage chest]].
| | |
| | 放置蓝图后,建筑布局是以虚影的形式存在。{{L|Construction robot}}将会开始从物流网络/玩家物品栏(若使用{{L|Personal roboport}})取得所需物品,并按照建筑布局的虚影一一对应放置建筑物。所需物品需要存放在物流网络中的{{L|Active provider chest}},{{L|Passive provider chest}}或{{L|Storage chest}}。 |
|
| |
|
| [[File:Blueprint-example-05.png]] | | [[File:Blueprint-example-05.png]] |
| | |
|
| |
|
| === 查看和删除蓝图 === | | === 查看和删除蓝图 === |
|
| |
|
| 右键点击蓝图图标可以查看和删除这个蓝图。删除后,蓝图会被清空并可以被重新设计。
| | 右键点击蓝图可以查看或删除这个蓝图。删除后,蓝图会被清空并可以被重新设置。 |
| | |
| == 补充信息 ==
| |
|
| |
|
| * 蓝图制作好后可以无限次使用.
| | == 导入/导出蓝图 == |
| * To place a blueprint that is blocked by existing buildings you can hold shift to place the things that aren't blocked.
| |
| * Buildings marked for destruction will not block placing a blueprint. The building cannot be placed until a construction bot can remove it. This can cause an item outside the construction zone to block construction of a 2x2 building on the edge of the zone.
| |
| * It is unknown if there is a limit for the size of a blueprint. But it is at least bigger then one screen, even when zoomed out all the way.
| |
| * Placing very large blueprints can be problematic when parts of it are out of the roboport construction area. If roboports are part of the blueprint and are placed inside the construction area they will extend the logistics zone as soon as it is powered up.
| |
| * Since 0.13, blueprints can be stored in a [[Blueprint book]]. This can store many blueprints while taking only one inventory spot.
| |
| * Editing a blueprint is not possible, it always has to be re-created after clearing.
| |
|
| |
|
| == 历史更新 ==
| | 蓝图可以以字符串的形式导出,同时也可以导入相应的字符串来创建新的蓝图。这种方式使得玩家之间共享蓝图变得十分方便。这种文本字符串是一种base64编码的压缩JSON字符串,它包含了蓝图的所有信息。因此,使得解码/解压这种字符串,通过JSON格式文本改变蓝图属性再重新编码/压缩成已知的文本字符串格式成为可能。这样便允许玩家在游戏外编辑蓝图。 |
|
| |
|
| {{history|0.15.0|
| | 有关蓝图的JSON格式的完整解释请参考[[Blueprint string format]]. |
| * Blueprint library: Allows for keeping players blueprints between individual game saves and allows sharing blueprints in multiplayer games.
| |
| * The build rotation of each blueprint is remembered independently of the general item build rotation.
| |
| * Alternative select with blueprints (shift + select) skips the blueprint setup GUI.
| |
| * Added ability to export and import blueprints, blueprint books, and deconstruction planners as strings.
| |
| * Blueprints, blueprint books and deconstruction planners are obtainable from the library GUI with no crafting cost.}}
| |
|
| |
|
| {{history|0.14.15|
| | == 补充信息 == |
| * Changed the clear blueprint icon to the trashcan icon and moved it to the left of the cancel button, to make it less confusing for users.}}
| |
|
| |
|
| {{history|0.13.13|
| | * 蓝图制作好后可以无限次使用. |
| * Added [http://lua-api.factorio.com/latest/LuaEntityPrototype.html entity prototype flags] not-blueprintable and not-deconstructable, so these can be controlled by mod makers.}} | | * 若蓝图放置区域内存在其他建筑物阻碍蓝图放置,可以按住shift将未受阻碍的部分放置下去。 |
| | | * 上述技巧可以用于清除放置区域的石块或树木。 |
| {{history|0.13.9|
| | * 蓝图的最大尺寸为10k x 10k{{L|Tile}}. |
| * Added tips and tricks for pasting wagon slots and cycling in [[blueprint book]].}} | | * 蓝图可以存放在{{L|Blueprint book}}。这样就可以只占用一个物品栏而存放无数个蓝图。 |
| | |
| {{history|0.13.7|
| |
| * Rocks can be mined while holding blueprints.}} | |
| | |
| {{history|0.13.5|
| |
| * Blueprints with labels will now show the label when holding them in the active hand.}} | |
| | |
| {{history|0.13.0| | |
| * Blueprints can now be edited.
| |
| * Added the [[blueprint book]] item, can hold multiple blueprints in one item.
| |
| * Modules are now supported by blueprints.
| |
| * Optimized drawing of connections between [[roboport]]s in blueprints.
| |
| * [[Virtual signals]] can be used in blueprint icons.
| |
| }} | |
| | |
| {{history|0.12.2|
| |
| * Enabled swapping held blueprints with other blueprints directly.
| |
| * Force building blueprints will mark colliding trees for deconstruction.}} | |
| | |
| {{history|0.12.0| | |
| * Enabled mining trees/ghosts while holding blueprints to be built.
| |
| * Building blueprints over existing ghosts restores the ghost's life time.
| |
| * Proper blueprint centering.
| |
| }}
| |
| | |
| {{history|0.11.18|
| |
| * Blueprints can be built over things marked for deconstruction.
| |
| * Blueprints can be force built by shift clicking.
| |
| }}
| |
| | |
| {{history|0.11.10|
| |
| * Added [http://lua-api.factorio.com/latest/LuaItemStack.html Lua API] for reading/writing information from blueprints.}}
| |
| | |
| {{history|0.10.2|
| |
| * The rotation of turrets in blueprints no longer matters when testing for entity collision.}}
| |
| | |
| {{history|0.10.0|
| |
| * Blueprints can copy [[circuit network]] connections.
| |
| * Miners in blueprints are now ignored if they are non-functional.
| |
| * An [[inserter]]'s logistic conditions are copied when blueprinting.
| |
| }}
| |
| | |
| {{history|0.9.4|
| |
| * Limit the size of the blueprint preview, so it is usable for very large blueprints.}}
| |
| | |
| {{history|0.9.2|
| |
| * The [[train stop]] and [[lab]] built from blueprints are now given dedicated names.}}
| |
| | |
| {{history|0.9.0|
| |
| *Introduced}}
| |
|
| |
|
| == 请参见 == | | == 请参见 == |
蓝图 (建设规划)是一种包含建筑物布局的物品。蓝图可以用来复制或者粘贴厂区建筑的各个部分。已有建筑的区域可以被选中并存入蓝图中。放置蓝图时,地图上会出现整个建筑布局的虚影。这个虚影可以为我们手动放置建筑提供参考,但更常见的做法是直接交给建设机器人自动完成建筑的放置。
成就
使用方法
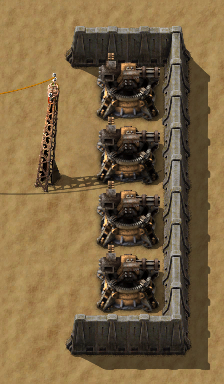
新的蓝图可以通过点击蓝图对话框里的“新蓝图”按钮获取,此对话框可通过按B键或点击地图上方的蓝图图标打开。蓝图可以用来复制一套建筑布局。
举例来说,我们可以复制如图所示的小型激光防御阵:
创建蓝图
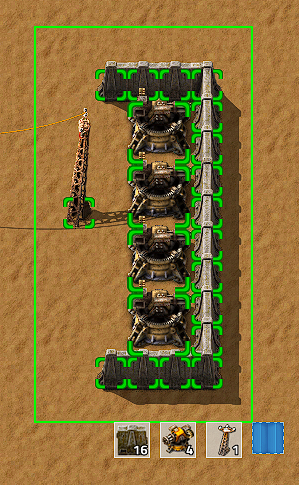
点击工具栏或者物品栏中的蓝图图标来创建一个蓝图。当蓝图图标出现在鼠标指针旁边时,按住鼠标左键拖拽出所需大小的区域。被选中并将被存入蓝图的建筑物将会标有绿色正方形边框(如图所示)。当选中好所有需要复制的建筑物后,松开鼠标左键,“图标设置”菜单会被打开。
图标设置
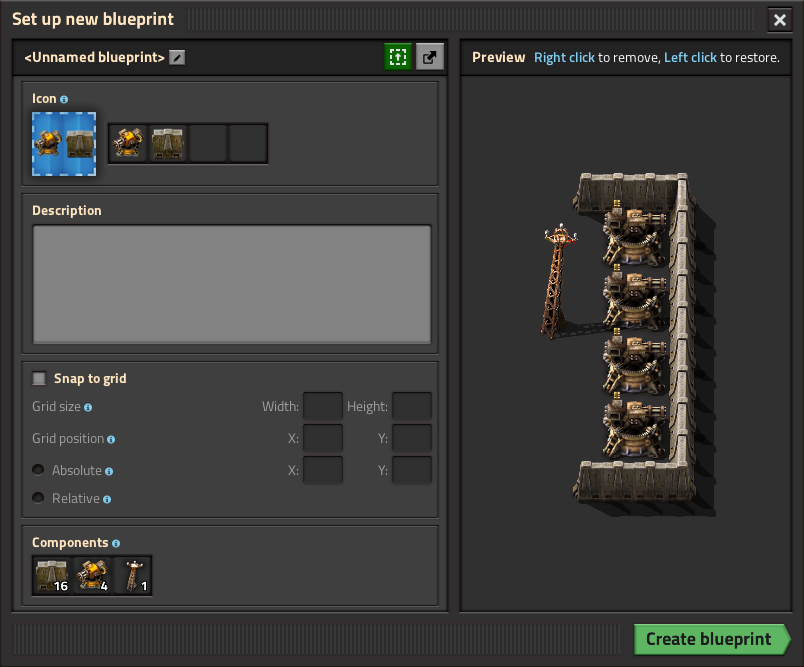
“图标设置”菜单的左上方有四个图标槽。游戏会根据蓝图中建筑物的数量来自动预生成图标的种类和数量。只需点击想要的图标便可将其更改为蓝图的图标样式。
“图标设置”菜单右上方有两个图标,分别为“创建蓝图”和“取消蓝图”。鼠标移至“创建蓝图”可以预览创建后的蓝图图标样式。
蓝图内建筑物的总数量显示在菜单底部。
确认设置无误后便可创建蓝图,否则可以取消蓝图。取消并不会消耗蓝图。创建好的蓝图会自动存放在工具栏或者物品栏中(若物品栏和工具栏已满,则直接掉在地上)
放置蓝图
若要使用/放置蓝图,只需选中工具栏或物品栏中已创建的蓝图。蓝图中的建筑布局会跟随显示在鼠标指针上。按r键可以旋转整个建筑布局。蓝图可以放置在机器人指令平台100x100的绿色(或橙色)区域内的任何位置,或者放置在模块装甲中机器人指令模块的范围内。
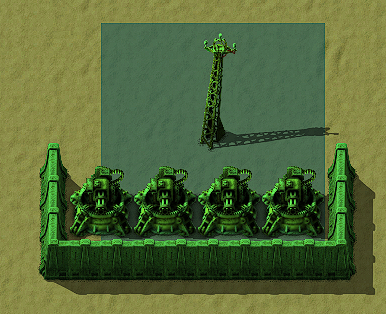
放置蓝图后,建筑布局是以虚影的形式存在。建设机器人将会开始从物流网络/玩家物品栏(若使用机器人指令模块)取得所需物品,并按照建筑布局的虚影一一对应放置建筑物。所需物品需要存放在物流网络中的主动供货箱(紫箱),被动供货箱(红箱)或被动存货箱(黄箱)。
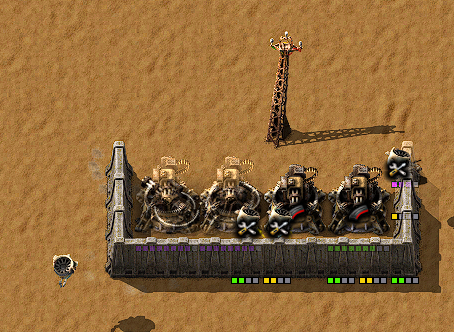
查看和删除蓝图
右键点击蓝图可以查看或删除这个蓝图。删除后,蓝图会被清空并可以被重新设置。
导入/导出蓝图
蓝图可以以字符串的形式导出,同时也可以导入相应的字符串来创建新的蓝图。这种方式使得玩家之间共享蓝图变得十分方便。这种文本字符串是一种base64编码的压缩JSON字符串,它包含了蓝图的所有信息。因此,使得解码/解压这种字符串,通过JSON格式文本改变蓝图属性再重新编码/压缩成已知的文本字符串格式成为可能。这样便允许玩家在游戏外编辑蓝图。
有关蓝图的JSON格式的完整解释请参考Blueprint string format.
补充信息
- 蓝图制作好后可以无限次使用.
- 若蓝图放置区域内存在其他建筑物阻碍蓝图放置,可以按住shift将未受阻碍的部分放置下去。
- 上述技巧可以用于清除放置区域的石块或树木。
- 蓝图的最大尺寸为10k x 10k格.
- 蓝图可以存放在蓝图簿。这样就可以只占用一个物品栏而存放无数个蓝图。
请参见


