Tutorial:Quick start guide
Erste Schritte
Sie haben also grade Factorio entdeckt und das Tuturial durchgespielt und haben keine Idee was Sie machen sollen? Kein Problem. Lassen Sie uns versuchen, Ihnen das Spiel etwas näher zu bringen.
Spiel beginnen
Wenn Sie das Spiel starten werden Sie zunächst das Hauptmenü sehen. Sie werden hier zunächst die richtigen Punkte anklicken müssen.
Sie sollten zuerst "Spielen" und dann "Neues Spiel" wählen. Dann sollten Sie ein größeres Menü für die Einstellungen der Karte sehen. Die Vorgabewerte sind für das erste Spiel vollkommen ausreichend.
Kartengenerator
Sie können diese Werte verändern, um die Karte generieren zu lassen wie Sie es möchten. Diese Werte können den Schwierigkeitsgrad der Karte stark beeinflussen.
Jeder Resourcentyp, ebenso wie Feindbasen, wird durch drei Werte gesteuert: Frequenz, Größe und Reichhaltigkeit.
- Die Frequenz bestimmt, wie oft Ihnen Erzvorkommen oder feindliche Basen auf der Karte begegnen
- Die Größe bestimmt, wie große die Erzvorkommen oder Feindbasen sind
- Die Reichhaltigkeit bestimmt wie viele Resourcen auf einem Erzfeld vorhanden sind und wie dicht die Feindbasen besiedelt sind
Für eine einfachere Anfangserfahrung sollten Sie die Frequenz der Resourcen auf "Sehr Hoch" und die Reichhaltigkeit auf "Sehr Gut" setzen. Dies wird sicherstellen, dass Sie genug Resourcen zur Verfügung haben und keine Weltreise vom Startpunkt aus unternehmen müssen um Resourcen zu finden. Eventuell sollten Sie die Größe der Feindbasen auf "Sehr Klein" setzten um die Anzahl der Feinde zu senken.
Wenn Sie mehr über den Kartengenerator wissen möchten, sollten Sie diesen Artikel lesen.
Friedlicher Modus
Wenn Sie beim Bauen nicht von Feinden belästigt werden wollen, sollten Sie die Option "Gegner greifen nie zuerst an" aktivieren. Feinde werden dann weiterhin erscheinen, aber sie bleiben in ihrem Gebiet solange Sie es nicht betreten.
Sobald Sie die Karte nach Ihrem Wunsch eingestellt haben, klicken Sie auf "Generieren". Eine neue Welt wird generiert, Ihr Spieler erscheint und Sie können loslegen.
Nützliche Tastaturbelegungen
Obwohl die meisten Steuerbefehle und Tastaturbelegungen in den Einstellungen zu finden sind schauen einige Spieler dort nicht nach. Hier ist eine Liste der wichtigsten:
| Tastenkombination | Aktion |
|---|---|
| ALT | Erweiterte Informationen anzeigen |
| T | Forschungsmenü öffnen |
| Q | Auswahl aufheben oder zu nächster Waffe wechseln |
| R | Drehen |
| Z | Gegenstand ablegen |
| F | Gegenstände aufheben |
| SPACE | Auf nächsten Gegner schießen |
| C | Auf ausgewähltes Ziel schießen |
| ENTER | Fahrzeug betreten/verlassen |
| X | Aktive Schnellleiste wechseln |
| P | Produktionsstatistik (verlassen mit P oder ESC) |
| M | Weltkarte umschalten (verlassen mit M oder ESC) |
| G | Zug-Waggons verbinden |
| V | Zug-Waggons trennen |
| SHIFT + Leertaste | Spiel pausieren |
| SHIFT + Linke Maustaste | Stapel verschieben |
| Mittlere Maustaste | Filter festlegen |
| Umschalt (SHIFT) + Rechte Maustaste | Stapel teilen |
| STRG (CTRL) + Linke Maustaste | Alle Gegenstände ins Inventar aufnehmen ohne Behälter zu öffnen |
| Umschalt (SHIFT) + Rechte Maustaste | Gegenstandseinstellungen kopieren (grüne Umrandung) |
| Umschalt (SHIFT) + Linke Maustaste | Gegenstandseinstellungen einfügen (gelbe Umrandung) |
Sehen Sie unter Nützliche Tastaturbelegungen nach, um mehr darüber zu erfahren, und darüber, wie Sie sie konfigurieren können.
Erste Schritte im Spiel
Ressourcen
Stellen Sie sicher, dass Sie diese vier Ressourcen in der Nähe Ihrer Anfangsposition im Spiel finden. Sie benötigen Kohle, Kupfererz, Eisenerz und Stein in einer bestimmten Nähe zueinander. Je weiter entfernt diese Ressourcen voneinander sind umso schwieriger wird es, sie zu verwenden, da sie zusammen verwendet werden.
Falls Ihre Anfangsposition über eine oder mehrere dieser Ressourcen nicht verfügt oder ein Vorkommen zu klein ist, drücken Sie einfach die ESC-Taste und wählen Sie "Neu starten", um eine neue Welt zu generieren.
Später im Spiel benötigen Sie außerdem Wasser und Rohöl. Da dies beides Flüssigkeiten sind ist es jedoch viel einfacher, sie zu über größere Distanzen zu transportieren, als die vier festen Ressourcen. Es ist also in Ordnung falls in Ihrer Anfangsposition kein oder nicht viel Wasser oder Rohöl vorhanden ist.
Alles in Factorio wird aus diesen sechs Grundressourcen hergestellt, weshalb das Spiel schwieriger wird falls Ihre Anfangsposition keinen einfachen Zugang zu diesen ermöglicht (besonders zu den vier festen Ressourcen).
Spitzhacke anfertigen
Gehen Sie zu irgendeiner Ressource und halten Sie die rechte Maustaste gedrückt. Es erscheint ein Fortschrittsbalken am unteren Bildschirmrand. Sobald dieser gefüllt ist, erhalten Sie die abzubauende Ressource. Womöglich stellen Sie fest, dass das manuelle Fällen von Bäumen und Abbauen von Erzen sehr langsam vorangeht. Ihr Spielcharakter schlägt mit einem Stock darauf ein. Wie wäre es mit einem Werkzeug-Upgrade? Drücken Sie "E", um Ihr Inventar und das Handwerk-Menü zu öffnen. Klicken Sie auf den Bereich "Produktion" und darunter mit der linken Maustaste auf die Eisenspitzhacke. Die Verwendung einer Eisenspitzhacke beim Abbauen von Rohstoffen wird die Abbaugeschwindigkeit deutlich erhöhen.
Erzförderer und Schmelzöfen aufstellen
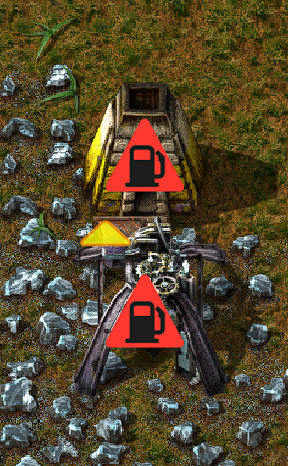
Sie beginnen Ihre Reise mit einem bescheidenen Schmelzofen und einem Befeuerten Erzförderer. Was tun wir damit? Zuerst sollten Sie Ihren Erzförderer an den Rand eines Eisenvorkommens platzieren, mit der Ausgabeseite in Richtung eines Ofens.
Sie können die Richtung des Förderers entweder ändern indem Sie die Taste "R" drücken bevor Sie ihn platzieren oder danach indem Sie "R" drücken während sich Ihr Mauszeiger darüber befindet. Der kleine gelbe Pfeil zeigt an, wo das geförderte Eisenerz herauskommen wird. Stellen Sie den Ofen direkt vor diesen Pfeil, damit der Erzförderer den Ofen automatisch befüllt. Das Ergebnis sollte in etwa so aussehen:
Denken Sie daran, die ALT-Taste zu drücken, um die Detailansicht zu sehen. Das macht es einfacher nachzuvollziehen, was was wohin befördert.
Mit Treibstoff befüllen
Großartig! Aber was bedeutet das große rote blinkende Symbol? Nun, es befindet sich kein Treibstoff in Erzförderer und Ofen.
Sie können sie entweder mit Holz oder Kohle befeuern. Klicken Sie mit der rechten Maustaste auf einen Baum um ihn zu fällen oder auf ein Kohlevorkommen um Kohle abzubauen.
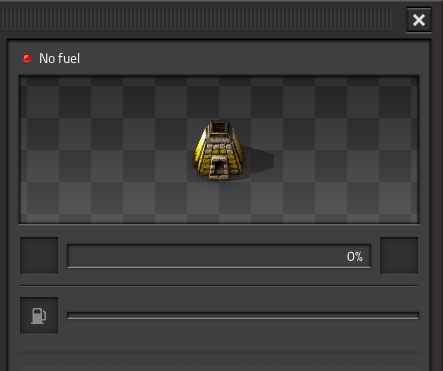
Wenn Sie mit Ihrer Spitzhacke etwas Treibstoff abgebaut haben, sollten Sie beginnen, Erzförderer und Ofen für Sie arbeiten zu lassen. Wenn Sie mit der linken Maustaste auf den Erzförderer oder Ofen klicken, erscheint die Schnittstelle zwischen Ihnen und dem Erzförderer oder Ofen:
Um Ihren Treibstoff darin abzulegen, klicken Sie mit der linken Maustaste darauf, um ihn aufzunehmen, und noch einmal links auf das Treibstoff-Symbol, um ihn abzulegen.
Wenn Sie einen Stapel halbieren wollen, damit Ihr Erzförderer und Ofen beide die Hälfte Ihres Treibstoffs bekommen können, klicken Sie mit der rechten Maustaste auf den Stapel in Ihrem Inventar und dann mit der linken Maustaste auf das Treibstoff-Symbol. So einfach! Jetzt sollten beide Maschinen laufen und Ihnen automatisch Eisenplatten herstellen. Versuchen Sie es auch mit STRG (CTRL) + Linksklick direkt auf die Maschine. Dies wird die Maschine mit der Hälfte des Stapels den Sie in der Hand halten befüllen.
Sie können den identischen Aufbau auch bei einem Eisenerzvorkommen anwenden, um Kupferplatten zu erhalten.
Production upgrade!
You know what's better than iron plates? More iron plates! Why don't we go ahead and get them?
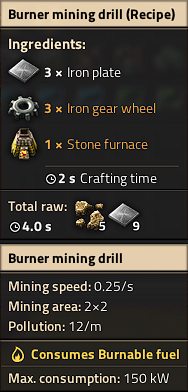
You'll need to craft some extra drills. If you hover over drill in the crafting menu, you'll see two lists of materials. The first list shows the components needed to make the drill; the second one at the very bottom of the tooltip window shows the raw resources needed to craft it. Unlike other games, you do not need to create the pre-requisite items before you select the item you want to make. All required items are crafted for you. You can see this process happening on the bottom left of the screen, where your Crafting Queue is. You can also queue up more crafting orders, as long as you have the necessary materials on you, and they'll get carried out one after the other.
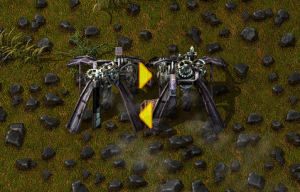
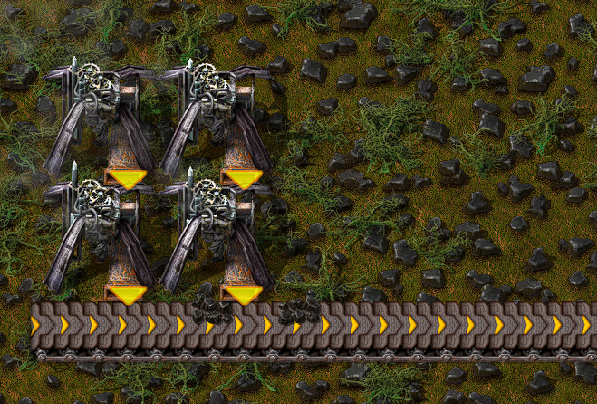
Now that you can afford some extra drill and furnaces, you should automate the acquisition of both coal and stone. These are easy to set up and work essentially the same as the iron setup. For Coal, you can have two drills facing each other: they'll run on the coal they get fed by their partner and you can collect the surplus.
Don't forget that you can collect resources from machines without opening their inventories, with CTRL-LMB. You might also want to activate the detailed view, by pressing the ALT key once. You can deactivate it by pressing ALT again.
And for stone you can have the drill output directly into a chest.
Once this is all setup up, you will probably want to make it go faster. Set up more drills with furnaces for the iron, setup some for copper and maybe lay more drills on the coal to cover for the extra coal production. In the early game, the most used resource is iron, so you'll probably need twice as many miners on iron than copper, if not more. But expect copper to become more and more important the more you mess with electricity and electronics!
More automation
Great! So now you have four or so furnaces making iron, a couple making copper, some stone production and a good amount of coal production. But you know what really sucks? having to run the coal around to all your other machines, right? Well let's automate that too! Conveyor belts and inserters are the way of the future! The output slots on the drill can also output onto conveyor belts to be transported to your other machines.
Now that we can take our coal to other places with no effort, we just need a way to input the coal into those machine.
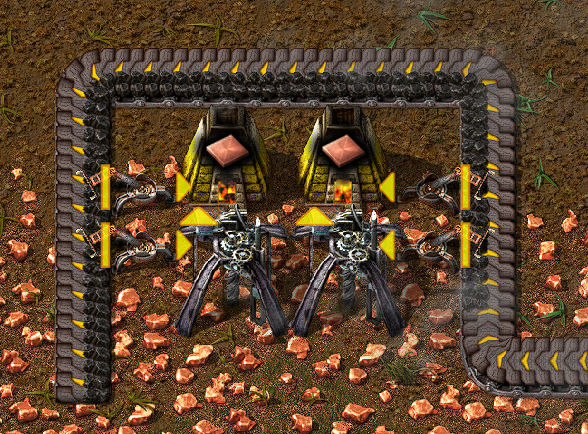
This is where Inserters step in. In the first few stages of the game, you can use burner inserters as a cheap way to move items from anything to anything. You can move object from the ground, chests, machines and put them wherever you want.
Burner Inserters themselves require coal to run though, which makes this a little counter intuitive to have to fuel them instead of the machines you are trying to fuel anyway.
Here is a small example of inserters working. Notice that the flat line is where the inserters will pick up from, and the arrow is where they will place the item.
Okay, so now we know how to automatically mine things and then how to automatically move things from one place to another, and then to place said items into machine or out of machines.
Next up we want to get some electricity so that we can have inserters that run of that instead of fuel.
Electrical power
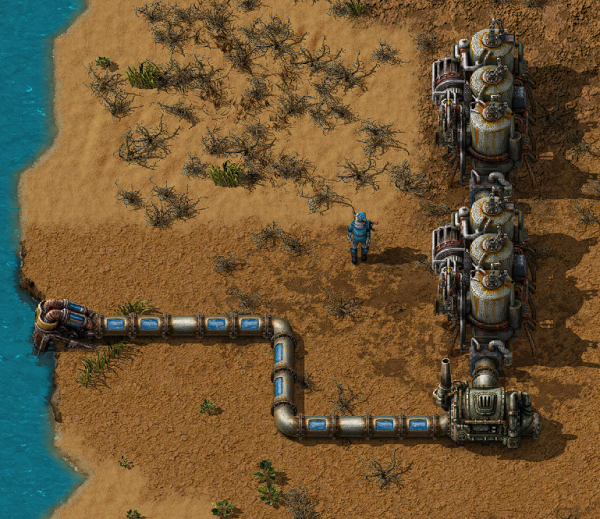
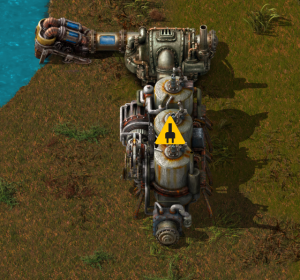
Electricity. This is where things start to get interesting. We're going to need a single Offshore Pump, some boilers and a Steam Engine. These are really simple to set up, they just require twenty-some iron plates and 5 stone per boiler. The offshore pump goes in the water and needs no power to run. From there, you can either use pipes to transport the water to boilers, or you can run boilers straight from the pump. Boilers allow water to flow through them just like pipes do, except they also heat the water along the way and cannot be used as corners. The pipes or the boilers then connect to the middle of the short side of the steam engine. Make sure you connect it in the right place or it won't work. Moreover, steam engines allow water to run through them just like boilers, so you can have as many engine as you want connected in a row. Here is a small example.
Now you need to use power poles to carry power to your machines. Place some down so that their coverage area (the blue square) overlaps each steam engine in at least one square. If they are going to connect, the machines that use power will be shown with a blue outline around their edges.
If the steam engine is producing power but nothing is using it, it'll show a yellow flashing icon: right now it's showing because we don't have electric machines yet!
Your power setup can look however you want it to look.
A great method is to have a line of boilers that supply a certain amount of steam engines with hot water, and then you can use transport belts to bring coal to them for inserters to place inside them so that your electricity is always running.
The most often used setup is 1 offshore pump, 14 boilers and 10 steam engines. This is due to this being the best ratio between the 3 of them. 1 pump produces enough water for 10 engine, and the 14 boilers is sufficient to heat the water for that many. The example above is easily expanded into this efficient design. But hey, this game is all about experimentation and for you to be able to find ways to do your own things! So get to it, and show off your own unique designs!
Using this power is as simple as creating a machine that runs on electricity and placing a power pole close enough to it that the blue square touches the machine, just like you have to do at the power plant with the engines. Make sure that there is a line of power poles that actually connect to your power plant.
Now that power is explained, we need to increase our resource production.
However, if you want detailed info on your power production/consumption, you can check the Detailed Electric Network Info, opened by clicking on any powerpole.
Re-thinking our resources and research
Next we really want to get onto automation of items, not just the smelting of ores.
Before we can get to that though, we're going to have increase our production of ores. This is where things start becoming a little tricky and there are few things you want to do at once. We really want to be able to set the factory to make things and let it go. But for that we need some extra utilities which we don't have and need to get through research.
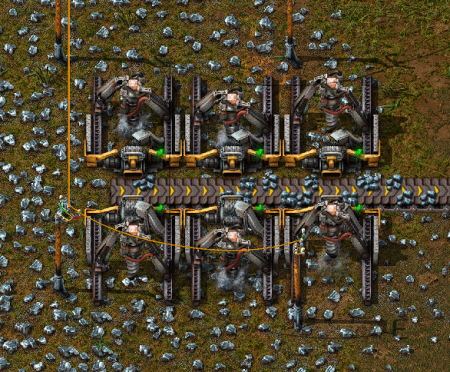
We haven't even touched on that yet! lets start by cranking up our resource production. Now that we have electricity, we can use Electric Mining Drills. These are much better than those scummy Burner ones. They work exactly the same except they are twice as fast and they don't rely on fuel, as you could guess by the names. You can have them to output your raw resources onto belts and get them to a place where you can mass process the ores into plates. Here is a small example of what you could do, but let your imagination and your calculating logic figure out other, maybe even better ways of doing it! You want ore to be split more or less evenly on each side of the belts. This helps with the amount of resources that can be carried to your base of operations on a single belt.
This is once again easily expandable all over an iron deposit. This conveyor belt can then take all of the ore to some sort of processing area. The processing area needs some machines that we currently don't have due to limitations in our research.
Most importantly, we want the long handed inserter. This inserter is able to reach twice as far as a normal inserter! It is very useful for bringing or placing items to or from conveyor belts that are one extra tile away. So what we need to do is to make some science labs. They don't cost too many resources, but take a little while to make. Craft one or two of them and connect them to power. When you first place one, you are going to get a popup asking you want you want to research. We really want automation right now. This gives us our inserters and the Assembling machine 1, which is going to be very useful in the near future.
You'll notice that the cost for this is 10 Science Pack 1's, or "red potions" or "flasks" as some people like to call them. These are simply another crafted item, which you should craft 10 of now and place them in your labs to begin researching. While you are waiting for your flasks to craft or your research to complete, lets continue building an ore processing center. We want a line of copper, iron and coal to be available for this area. Despite being in the electric era, our furnaces still need coal until a little further down the line.
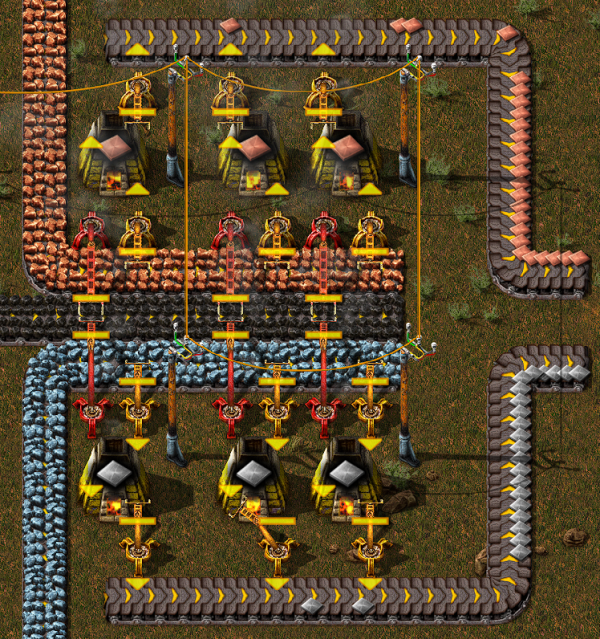
Below is another sample of how you could set up your area. There are efficient ways of making them that you might see on the forum, but if you want to learn about what they are and how they work, you can either experiment yourself or search the wiki/forum for some better designs.
As per usual, I leave this area with plenty of room to expand later on when demands become higher. The important parts about this is that you need the red, long handed inserters to be able to reach the coal in the middle to fuel your furnaces. You need seperate belts for your incoming raw materials to be able to be processed, and then another belt outside of them to handle the output after they have been smelted. These materials can then go straight into your base to be made into a myriad of other things. Finally, we have a steady and upgradeable supply of copper and iron plates, and we can get into further automation with the assembling machines so we can automate creation of things like Science Packs, Ammunition and every other item that the player themselves can craft, but without you involved at all!
Automating that research
Ok, so a fair amount has happened. Now, to be able to progress into later parts of the game with better research we are going to want automate the process of making science packs and putting them into the labs. This way we won't have to worry about research any longer.
There are many designs that you can find on the forums, but I'll show you something simple, letting you find what works for you. I would highly recommend that you research Logistics as your next research, and in fact manually craft the science required for this. The logistic research gives you some important things: the splitter, the underground belt and the fast inserter. The splitter and underground belts are some of the most important items you'll get at this stage. They do pretty much what their names imply.
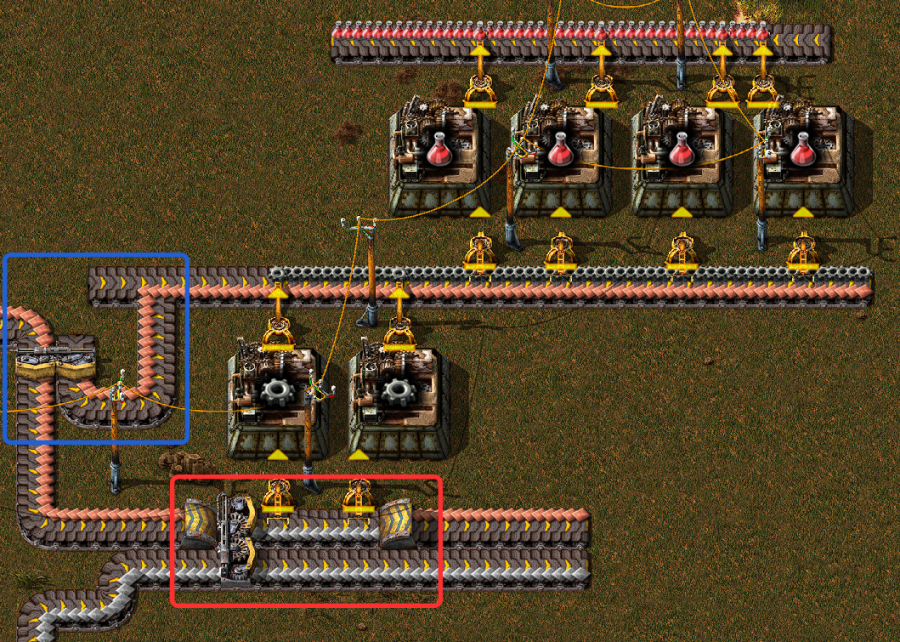
So what do science packs require? We need copper plates and iron gears. So far we have only dealt with raw resources, how do we make craftable things? The Assembler answers your prayers! If you place an assembler down and open its interface, it asks you what you would like it to craft. Once you select one, if you put the ingredients in that it requires it will craft the item and you can pull out the finished product. In the case of red science packs, we will need an assembler making iron gears, and an assembler making the actual packs. A nice way of doing this is to have a conveyor belt with 1 side containing the copper plates and the other side taking the gears from another assembler like below.
Now this picture uses a few neat little tricks that I will explain in detail. If you have your plate belts seperate, and you want them running side by side there can be issues with trying to grab one or the other resources from the far belt. Yes, you could use a long inserter, but in some cases you don't want this (e.g. you need a fast inserter to get resources quickly into your assemblers).
The area in red is a good way to get around this. By having a splitter, you can move the far belt from your production in close while also allowing it to continue down the line for later use. For the copper, we use an underground belt to go underneath the area that is now taken by the far line which also allows the copper to continue on. Once again, this is only one possible method of doing things and you are in no way obligated to follow it.
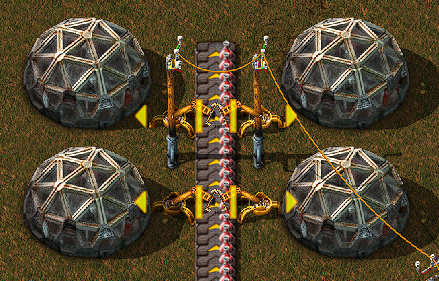
The area in blue is a quick way to allow copper to continue down the main line, while also splitting some off for our red science assemblers. Notice how when it joins the line that the gears are on, they only join the bottom side of the belt. The little extra belt that I added to the left stops the belt from becoming a turn, and therefore makes the items only join the side I want them to. The rest is simple: the gears and copper get pulled into the assemblers, they make the science and then it gets pulled out again on the other side. These flasks can then be transported to some labs to automatically do your research for you, for example like this:
