Tutorial:Quick start guide/ja: Difference between revisions
mNo edit summary |
m (→生産のアップグレード!) |
||
| Line 73: | Line 73: | ||
== 生産のアップグレード! == | == 生産のアップグレード! == | ||
鉄板より、よい鉄板は何でしょう? '''沢山'''の鉄板です! | |||
追加の掘削機を製作します。クラフトメニューの掘削機をマウスオーバーすると、ツールチップウィンドウが表示され、そこには資源のリストが2つ表示されます。 | 追加の掘削機を製作します。クラフトメニューの掘削機をマウスオーバーすると、ツールチップウィンドウが表示され、そこには資源のリストが2つ表示されます。 | ||
| Line 83: | Line 82: | ||
:[[File:Recipe.PNG|center|upright=2|thumb]] | :[[File:Recipe.PNG|center|upright=2|thumb]] | ||
増えた掘削機と炉を効果的につかうため、石炭と鉱石の産出を自動化していきます。 | |||
鉄板と同じように簡単に設置し効果を得ることができます。 | |||
石炭は掘削機をお互いに向かい合わせに設置することで、相手側に稼働用の燃料を補給しつつ余った分を集めることができます。余剰となった分は、機械にあるスロットに1スタック分まで蓄積されます。 | |||
覚えておきたいのが、ウィンドウを開けずとも、機械にマウスカーソルをあわせて"CTRLキー"+左クリックで、機械にある資源を自分のインベントリへ集めることができます。 | |||
また、"ALTキー"で詳細表示を切り替えるのも有効です。 | |||
[[File:SimpleCoal.PNG|center|thumb]] | [[File:SimpleCoal.PNG|center|thumb]] | ||
[[Stone|石]]は、矢印の先にチェストを設置するだけで、直接チェストに入れることができます。 | |||
一度全部できるようになれば、もっと速くしたくなるでしょう。より多くの炉とより多くの掘削機を鉄のために設置し、銅のためには数個設置し、石炭のためにはそれをカバーするだけ充分に掘削機を多く置いていきます。 | |||
ゲーム序盤においては、鉄が最も使う資源です。銅の倍くらいは鉄が要るでしょう。ただ、銅も今後電化や電気機器を用いるようになるともっともっと重要になってくるので、惑うことにもなりますが! | |||
=== もっと自動化! === | |||
4つ程の鉄板を作る炉と、銅板を作る炉2つ、少しの石と相当量の石炭の生産ができるようになれば、とてもうまくいってます。 | |||
でも、マジでアレな感じしませんか? ホントに石炭をくべに機械全部にいちいち走って回んなきゃなんないの? これも自動化しちゃいましょう! 搬送ベルトとインサータが実現する方法の一つです。 | |||
掘削機の出力スロットは搬送ベルトに載せることもでき、他の機器へ搬送に使えます。 | |||
[[File:CoalConveyor.PNG|center|upright=2|thumb]] | [[File:CoalConveyor.PNG|center|upright=2|thumb]] | ||
これで石炭は他の場所へ手間なく移動させることができます。あとは機器へ投入する方法だけです。 | |||
ここで、[[Inserters|インサータ]]を使うステップについて見ていきます。ゲーム初期の数段階までは、どこからどこへも移動させるインサータのうちチープな[[Burner_Inserter|燃料式インサータ]]を使っていきます。物体を地面、チェスト、機械から、またそれらへ望むように移動できます。 | |||
燃料式インサータは、その稼働に石炭をそれ自身に対して必要で、直感と少し違って、何かに燃料を補給しようとしようとすると、まずインサータ自体に燃料を取り込んでしまいます。 | |||
コンパクトなインサータの動作例をご覧ください。注目してほしいのが、黄色の直線がインサータがここからピックアップする場所を示していて、黄色の矢印がその場所へアイテムを移動する場所を示しています。 | |||
[[File:SimpleOreProcessing.PNG|center|upright=2|thumb]] | [[File:SimpleOreProcessing.PNG|center|upright=2|thumb]] | ||
(つまり、これではインサータが機能しない箇所があります。それはどことどこでどうすればよいでしょうか。) | |||
ここまでで、資源を掘削する方法、それらを自動的にある地点からある地点へ移動させる方法、そして、アイテムを機器に入れたり出したりする方法がわかればOKです。 | |||
次に[[Electric system|電気システム]]を見ていきたいと思います。インサータは燃料を取り込むことなく使えるようになります。 | |||
== Electrical power == | == Electrical power == | ||
Revision as of 03:49, 27 October 2016
はじめに
もしまだ「チュートリアル」を終えても迷っていたら、このガイドが支援します。
ゲームスタート
ゲームを始めるにはメインメニューから「プレイ」、「ニューゲーム」を選択します。 マップ設定に移ります。 最初はこれらに触れる必要はありません。
ワールドジェネレーター
これらのオプションでマップ生成を異なる方法に変えることができます。マップ生成の変更はゲームの難易度に大きく影響します。
資源とバイターの巣は、生成割合、サイズ、資源量の3つの値でコントロールします。
- 生成割合: どの程度の頻度で鉱脈や巣がフィールドに現れるか決定します。
- サイズ: 鉱脈や巣がどの程度の広さか決定します
- 資源量: 鉱脈タイルが枯渇するまでの量および巣の密集量を決定します。
もし開始時に簡単にしたいのなら、資源については生成割合、サイズ、資源量を増やし、敵の巣は減らすことを考えましょう。
ワールドジェネレータでさらに情報を得られます。
ピースフルモード
もし敵の攻撃なく建設を楽しみたいならば、ピースフルモードオプションを有効にします。敵の巣はそれでも生成されますが、敵は挑発しない限りは攻撃してきません。これは、敵がプレーヤーの建設物を壊わさないものの、敵の巣を破壊したときに出現する素材を集めることはできるようになります。
キーバインディング
キーボードのキーの割り当てについて、およびそのコンフィグについてはキーバインディングを参照してください。
最初期
資源
プレーヤーの出現した近くに、4つの固体資源、石炭、銅鉱石、鉄鉱石、石があるのを確認してください。それらはお互い理不尽でない近さに見つけられるはずで、それらが遠くにあるほどルートを作って組み合わせて使うことが難しくなります。
そして、スタート地点には水もあることが望まれます。それは蒸気機関に必要となります。
もしスタート地点にそれらのひとつでもないか、すごく量が乏しいか、とても遠く離れているならば、シンプルに、Escキーを押して「リスタート」を選んでください。そうすればフィールドが再生成され新しい場所に現れます。ぼちぼちのフィールドの生成には何度か試すことになるかもしれません。
後に原油も必要となります。しかしながら、液体であり、4つの資源より遠距離の輸送がとても簡単です。もし近くに油田がなくとも、ゲーム後期に長距離の流体輸送が可能になるまでは必要ないので、OKです。
Factorio のあらゆるものは、6つの基本的な資源から作られ、ゲームクリアに必要なのはそれらが全てです。
採掘ツール
工具なしでは、資源を収穫することはできず、任意の配置された施設を取り壊しすらできません。 "Eキー"を押すと、左側に持っているアイテム一覧(インベントリ)と、右側に製作可能なアイテム一覧(クラフトメニュー)が表示されます。 スタート時に鉄板は鉄の斧を製作するだけ持っているので、クラフトメニューの2番目の「生産」タブに移動し、鉄斧のアイコンをクリックし、鉄の斧を作成してください。
掘削機と炉の設置
はじめは石の炉と燃料式掘削機を使います。直に手で必要な限りの資源を採取することなります。 ゲームの最初は、炉に向かって面するように鉄鉱石が出てくる箇所がくるように掘削機を設置します。
掘削機を設置したとき、掘削機の上に黄色い矢印が表示されていなければ、"Altキー"を押して詳細表示に切り替えてください。もう一度"Altキー"を押すと詳細表示は消えます。
掘削機を設置する前に"Rキー"で向きを変えることができ、設置したあとでも掘削機をマウスオーバーして"Rキー"を押して回転できます。黄色い矢印が鉄鉱石の出てくるところを示しています。炉を矢印の先におけば、掘削機が自動的に炉に鉱石を投入します。ここまでが次のようになります:
"Altキー"を押して詳細表示にすることを忘れないでください。これは何か起きた時に対処しやすくなります。
燃料補給
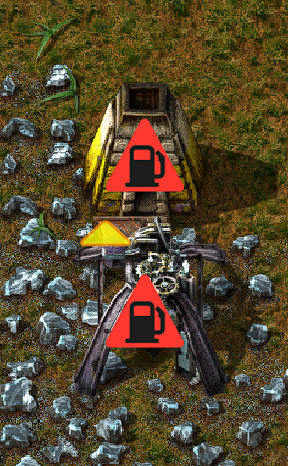
掘削機と炉をおいたところですが、これらは燃料を必要とします。
原木や石炭などで駆動できます。これらの採取には、木を切り倒すか石炭を採掘しなければなりません。採掘には木や石炭鉱の上にマウスオーバーし、右クリック長押しで採れます。
インベントリにいくつか燃料を得たら、炉や採掘機を左クリックし画面を開きます。
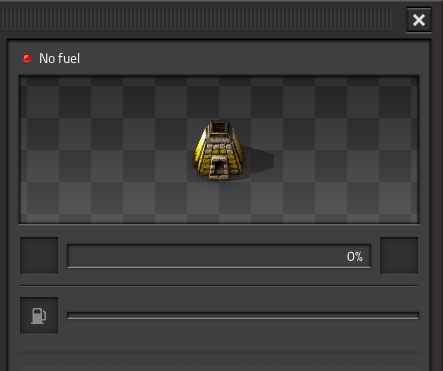
燃料を機械に入れるには、燃料を左クリックしてピックアップし、燃料スロット(ガソリンスタンドのある欄)の上で左クリックし燃料を置きます。
スロット1つ分、これを1スタックと言いますが、もし1スタックを半分ずつに分けたいなら、スタックをクリックする時、右クリックを使ってクリックすれば、半分だけピックアップでき、それを燃料スロットに入れたり、別のスタックへ置くこともできます。
こうしてどちらの機械にも燃料を入れると稼働を始め、自動的に鉄板が生成されるはずです。
スタックを"CTRL-右クリック"すればスタックの半分がダイレクトに入ります
銅鉱石も同じように設置すれば銅板が得られます。
生産のアップグレード!
鉄板より、よい鉄板は何でしょう? 沢山の鉄板です!
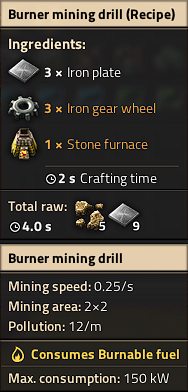
追加の掘削機を製作します。クラフトメニューの掘削機をマウスオーバーすると、ツールチップウィンドウが表示され、そこには資源のリストが2つ表示されます。 1つ目のリストは掘削機の製作に必要な構成アイテムが表示していて、2つ目のリストはツールチップウィンドウの下の方ににあるもので掘削機の製作の元に必要な資源を表示しています。 他のゲームと異なり、製作に必要な前提アイテムを予め製作しなければならないということはありません。必要なアイテムはあわせて作られます。 製作中、画面の左下にこのプロセスの進捗を見ることができます。 また製作中も必要な資源の限り製作待機を追加することができます。これらは順々に製作していきます。
増えた掘削機と炉を効果的につかうため、石炭と鉱石の産出を自動化していきます。 鉄板と同じように簡単に設置し効果を得ることができます。
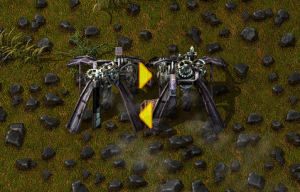
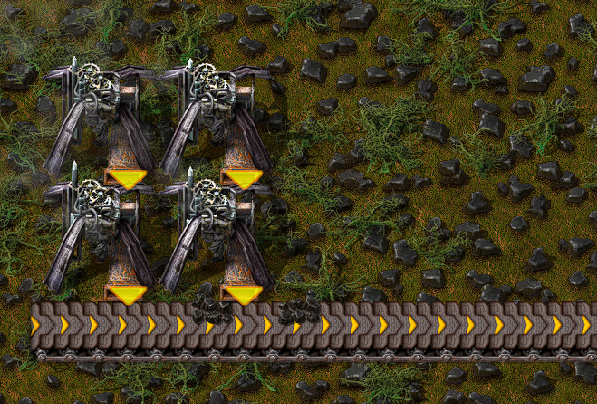
石炭は掘削機をお互いに向かい合わせに設置することで、相手側に稼働用の燃料を補給しつつ余った分を集めることができます。余剰となった分は、機械にあるスロットに1スタック分まで蓄積されます。
覚えておきたいのが、ウィンドウを開けずとも、機械にマウスカーソルをあわせて"CTRLキー"+左クリックで、機械にある資源を自分のインベントリへ集めることができます。 また、"ALTキー"で詳細表示を切り替えるのも有効です。
石は、矢印の先にチェストを設置するだけで、直接チェストに入れることができます。
一度全部できるようになれば、もっと速くしたくなるでしょう。より多くの炉とより多くの掘削機を鉄のために設置し、銅のためには数個設置し、石炭のためにはそれをカバーするだけ充分に掘削機を多く置いていきます。 ゲーム序盤においては、鉄が最も使う資源です。銅の倍くらいは鉄が要るでしょう。ただ、銅も今後電化や電気機器を用いるようになるともっともっと重要になってくるので、惑うことにもなりますが!
もっと自動化!
4つ程の鉄板を作る炉と、銅板を作る炉2つ、少しの石と相当量の石炭の生産ができるようになれば、とてもうまくいってます。
でも、マジでアレな感じしませんか? ホントに石炭をくべに機械全部にいちいち走って回んなきゃなんないの? これも自動化しちゃいましょう! 搬送ベルトとインサータが実現する方法の一つです。
掘削機の出力スロットは搬送ベルトに載せることもでき、他の機器へ搬送に使えます。
これで石炭は他の場所へ手間なく移動させることができます。あとは機器へ投入する方法だけです。
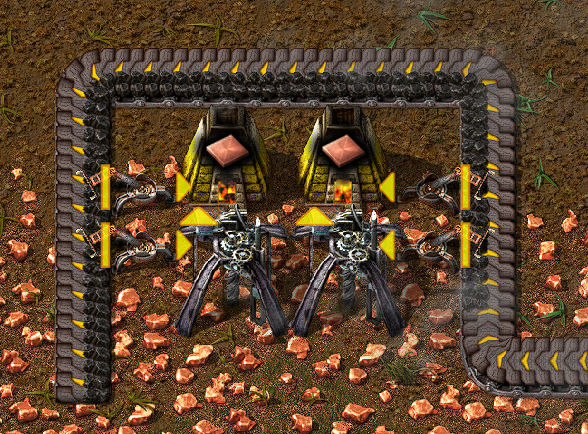
ここで、インサータを使うステップについて見ていきます。ゲーム初期の数段階までは、どこからどこへも移動させるインサータのうちチープな燃料式インサータを使っていきます。物体を地面、チェスト、機械から、またそれらへ望むように移動できます。
燃料式インサータは、その稼働に石炭をそれ自身に対して必要で、直感と少し違って、何かに燃料を補給しようとしようとすると、まずインサータ自体に燃料を取り込んでしまいます。
コンパクトなインサータの動作例をご覧ください。注目してほしいのが、黄色の直線がインサータがここからピックアップする場所を示していて、黄色の矢印がその場所へアイテムを移動する場所を示しています。
(つまり、これではインサータが機能しない箇所があります。それはどことどこでどうすればよいでしょうか。)
ここまでで、資源を掘削する方法、それらを自動的にある地点からある地点へ移動させる方法、そして、アイテムを機器に入れたり出したりする方法がわかればOKです。
次に電気システムを見ていきたいと思います。インサータは燃料を取り込むことなく使えるようになります。
Electrical power
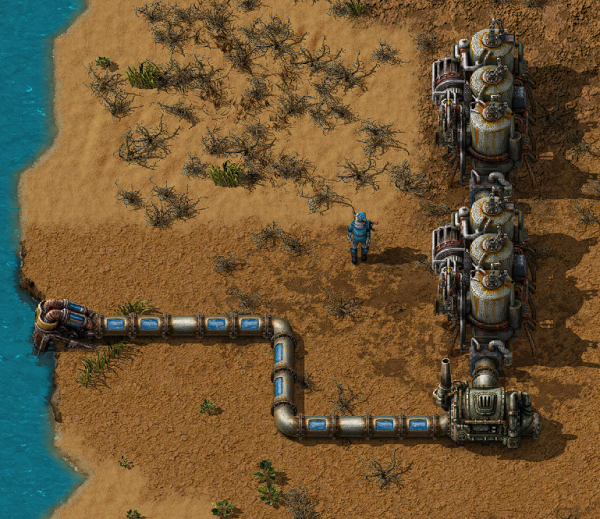
Electricity. This is where things start to get interesting. We're going to need a single Offshore Pump, some boilers and a Steam Engine. These are really simple to set up, they just require twenty-some iron plates and 5 stone per boiler. The offshore pump goes in the water and needs no power to run. From there, you can either use pipes to transport the water to boilers, or you can run boilers straight from the pump. Boilers allow water to flow through them just like pipes do, except they also heat the water along the way and cannot be used as corners. The pipes or the boilers then connect to the middle of the short side of the steam engine. Make sure you connect it in the right place or it won't work. Moreover, steam engines allow water to run through them just like boilers, so you can have as many engine as you want connected in a row. Here is a small example.
Now you need to use power poles to carry power to your machines. Place some down so that their coverage area (the blue square) overlaps each steam engine in at least one square. If they are going to connect, the machines that use power will be shown with a blue outline around their edges.
If the steam engine is producing power but nothing is using it, it'll show a yellow flashing icon: right now it's showing because we don't have electric machines yet!
Your power setup can look however you want it to look.
A great method is to have a line of boilers that supply a certain amount of steam engines with hot water, and then you can use transport belts to bring coal to them for inserters to place inside them so that your electricity is always running.
The most often used setup is 1 offshore pump, 14 boilers and 10 steam engines. This is due to this being the best ratio between the 3 of them. 1 pump produces enough water for 10 engine, and the 14 boilers is sufficient to heat the water for that many. The example above is easily expanded into this efficient design. But hey, this game is all about experimentation and for you to be able to find ways to do your own things! So get to it, and show off your own unique designs!
Using this power is as simple as creating a machine that runs on electricity and placing a power pole close enough to it that the blue square touches the machine, just like you have to do at the power plant with the engines. Make sure that there is a line of power poles that actually connect to your power plant.
Now that power is explained, we need to increase our resource production.
However, if you want detailed info on your power production/consumption, you can check the Detailed Electric Network Info, opened by clicking on any powerpole.
Re-thinking our resources and research
Next we really want to get onto automation of items, not just the smelting of ores.
Before we can get to that though, we're going to have increase our production of ores. This is where things start becoming a little tricky and there are few things you want to do at once. We really want to be able to set the factory to make things and let it go. But for that we need some extra utilities which we don't have and need to get through research.
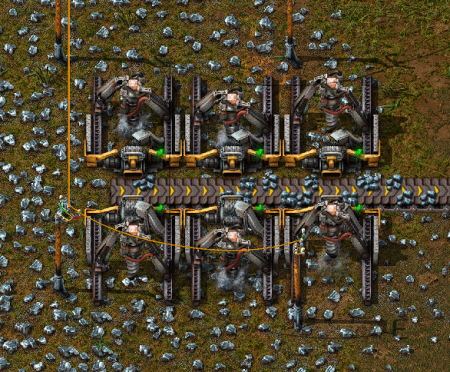
We haven't even touched on that yet! lets start by cranking up our resource production. Now that we have electricity, we can use Electric Mining Drills. These are much better than those scummy Burner ones. They work exactly the same except they are twice as fast and they don't rely on fuel, as you could guess by the names. You can have them to output your raw resources onto belts and get them to a place where you can mass process the ores into plates. Here is a small example of what you could do, but let your imagination and your calculating logic figure out other, maybe even better ways of doing it! You want ore to be split more or less evenly on each side of the belts. This helps with the amount of resources that can be carried to your base of operations on a single belt.
This is once again easily expandable all over an iron deposit. This conveyor belt can then take all of the ore to some sort of processing area. The processing area needs some machines that we currently don't have due to limitations in our research.
Most importantly, we want the long handed inserter. This inserter is able to reach twice as far as a normal inserter! It is very useful for bringing or placing items to or from conveyor belts that are one extra tile away. So what we need to do is to make some science labs. They don't cost too many resources, but take a little while to make. Craft one or two of them and connect them to power. When you first place one, you are going to get a popup asking you want you want to research. We really want automation right now. This gives us our inserters and the Assembling machine 1, which is going to be very useful in the near future.
You'll notice that the cost for this is 10 Science Pack 1's, or "red potions" or "flasks" as some people like to call them. These are simply another crafted item, which you should craft 10 of now and place them in your labs to begin researching. While you are waiting for your flasks to craft or your research to complete, lets continue building an ore processing center. We want a line of copper, iron and coal to be available for this area. Despite being in the electric era, our furnaces still need coal until a little further down the line.
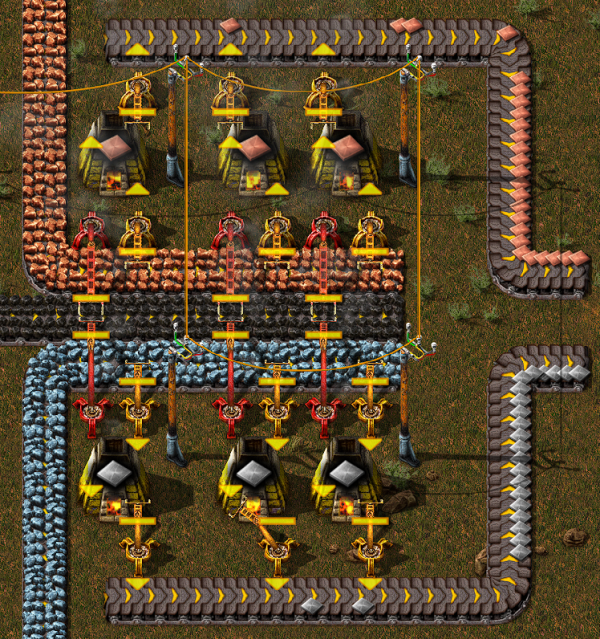
Below is another sample of how you could set up your area. There are efficient ways of making them that you might see on the forum, but if you want to learn about what they are and how they work, you can either experiment yourself or search the wiki/forum for some better designs.
As per usual, I leave this area with plenty of room to expand later on when demands become higher. The important parts about this is that you need the red, long handed inserters to be able to reach the coal in the middle to fuel your furnaces. You need seperate belts for your incoming raw materials to be able to be processed, and then another belt outside of them to handle the output after they have been smelted. These materials can then go straight into your base to be made into a myriad of other things. Finally, we have a steady and upgradeable supply of copper and iron plates, and we can get into further automation with the assembling machines so we can automate creation of things like Science Packs, Ammunition and every other item that the player themselves can craft, but without you involved at all!
Automating that research
Ok, so a fair amount has happened. Now, to be able to progress into later parts of the game with better research we are going to want automate the process of making science packs and putting them into the labs. This way we won't have to worry about research any longer.
There are many designs that you can find on the forums, but I'll show you something simple, letting you find what works for you. I would highly recommend that you research Logistics as your next research, and in fact manually craft the science required for this. The logistic research gives you some important things: the splitter, the underground belt and the fast inserter. The splitter and underground belts are some of the most important items you'll get at this stage. They do pretty much what their names imply.
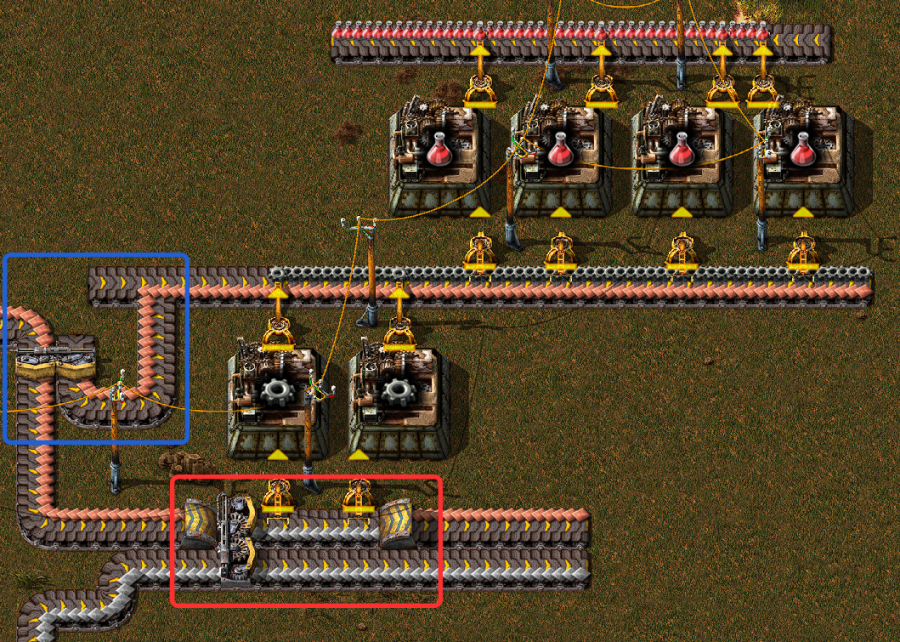
So what do science packs require? We need copper plates and iron gears. So far we have only dealt with raw resources, how do we make craftable things? The Assembler answers your prayers! If you place an assembler down and open its interface, it asks you what you would like it to craft. Once you select one, if you put the ingredients in that it requires it will craft the item and you can pull out the finished product. In the case of red science packs, we will need an assembler making iron gears, and an assembler making the actual packs. A nice way of doing this is to have a conveyor belt with 1 side containing the copper plates and the other side taking the gears from another assembler like below.
Now this picture uses a few neat little tricks that I will explain in detail. If you have your plate belts seperate, and you want them running side by side there can be issues with trying to grab one or the other resources from the far belt. Yes, you could use a long inserter, but in some cases you don't want this (e.g. you need a fast inserter to get resources quickly into your assemblers).
The area in red is a good way to get around this. By having a splitter, you can move the far belt from your production in close while also allowing it to continue down the line for later use. For the copper, we use an underground belt to go underneath the area that is now taken by the far line which also allows the copper to continue on. Once again, this is only one possible method of doing things and you are in no way obligated to follow it.
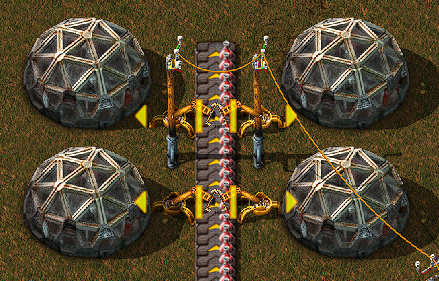
The area in blue is a quick way to allow copper to continue down the main line, while also splitting some off for our red science assemblers. Notice how when it joins the line that the gears are on, they only join the bottom side of the belt. The little extra belt that I added to the left stops the belt from becoming a turn, and therefore makes the items only join the side I want them to. The rest is simple: the gears and copper get pulled into the assemblers, they make the science and then it gets pulled out again on the other side. These flasks can then be transported to some labs to automatically do your research for you, for example like this:
